Tuesday, January 27, 2009

Sunbonnet Potholder - 8

Last time, we crocheted the potholder together. Now we're going to add a scallop trim to the front of the bonnet.

Here's the way I wrote up the scallop edging when writing up the pattern:
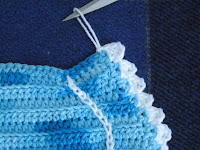
Turn. Continuing to use contrasting color, repeat * ch 3, dc 2 in same space, skip 1, slip stitch 1* to where neck flap meets the main part of the bonnet. Slip stitch 2, then continue to repeat * ch 3, dc 2 in same space, skip 1, slip stitch 1* along the front of the bonnet to the point of the brim. Break yarn. Weave in ends.

In other words, after finishing the last sc in crocheting the potholder together, ch 3. Then dc 2 in that sc stitch -- making a scallop. Skip the next sc, make a slip stitch in the following sc. Then ch 3, dc 2 in the same stitch (the one that you made a slip stitch in), skip the next sc, make a slip stitch in the following sc. Continue in this manner to where the top of the bonnet meets the neck flap. Slip stitch twice. Then ch 3, dc 2 in the same stitch (the one that you made a slip stitch one), skip the next sc, make a slip stitch in the following sc. Continue in this manner to the top of the front of the bonnet. Cut the yarn and weave in ends.

The picture above shows the bonnet after all the scallops have been made with the yarn ready to be cut.

Note: Generally, when slip stitching, one makes the slip stitch through the back loop only. But, in this case, it would be better to slip stitch through both loops.

Note: "Slip 1, ch 3" produces the equivalent of a single dc. The effect is to produce the equivalent of 3 dc's in the same space.

Finally, comes tying the bow. The easiest way to tie a bow is to fold over the chains as in the picture and then tie together.

Note: The extra slip stitches in the scallop edging will lie under the bow.

Tuesday, January 13, 2009

Sunbonnet Potholder - 7

This potholder is designed to be worn over the hand -- or, at least, used double thickness. So, the next step is to crochet the 2 pieces together.

This will be done using a single crochet stitch. Slip stitches are also often used to crochet pieces together. In fact, just about any crochet stitch could be used. However, I selected the sc since it's sturdy and looks about the same from either side.

Place the bonnets together, right sides out.

Using white, place a slip knot around the hook -- in preparation for the first sc. Make the first sc at the bottom of the back of the neck flap. Continue to sc the bonnets together. Use white to sc the edges of the neck flap together and blue to sc the edges of the rest of the bonnet together. On the sides of the bonnet, you'll be making 3 - 4 sc's per 2 rows, approximately 1 stitch in from the side. When changing yarn, do the last yo of the sc with the next color (as in the pic) -- since the loop produced at the conclusion of the stitch will be the top of the next stitch.

On the top of the bonnet, you'll be making 1 sc per st, placing the hook through the top loops (all 4 of them) for each stitch.

Stop when reaching the bottom of the front of the neck flap. Do not break yarn. However, weave in all the other ends. Next week will be the conclusion -- scalloping.

By the way, this pattern is turning out so well that I've added it to Ravelry under Sunbonnet Potholder.

Tuesday, January 6, 2009

Sunbonnet Potholder - 6

The next step is another chain stitch embellishment -- this one across the dividing line between the neck flap and the main part of the bonnet.

This time start at the back of the bonnet where the neck flap and bonnet meet. Put a hook through the bonnet (at the bottom of a blue stitch nearest the back of the bonnet) and draw some yarn through. Put the hook through the bonnet again (at the bottom of the next blue stitch) and draw yarn through the loop just made.

Continue in this manner until reaching the front of the bonnet. The first picture shows this process a third of the way through -- though, of course, it's upside down from how you'd be crocheting the chain embellishment.

Then, instead of breaking the yarn when reaching the front of the bonnet, continue to chain. Chain 30 ( -- 6 to 7") or more. Break yarn. Weave in ends. The chain will be used to tie a bow at the front of the hat (another embellishment).

The second picture shows a pair of bonnets. Next time, we'll crochet them together. (They are actually the same size.)

added April 16th: After reading the latest newsletter from Talking Crochet (April 14th, 2009), I discovered that this type of crocheting has a name -- tambour -- French for drum. That makes sense since if one wanted to make a chain stitch embellishment onto linen, you'd have to use an embroidery loop to hold the material tight -- which would look like a drum skin tightened across a drum.