Between the sections on "Fancy Stitches" and on "Irish Crochet" in the booklet from the American Thread Company (which I inherited from my MIL), there is a section on trims. The first 2 trims it talks about are cords.
The twisted cord is pretty self-explanatory. It's the second cord in the picture. To make this, you get several strands of string or yarn and twist them. Then you bring the ends together, and let the strands twist around each other. Finally, you tie a knot where the ends meet to prevent the cord from untwisting.
The other cord (1. Crocheted Cord) described in the booklet involves crocheting. (Directions for both cords are at the right.) It reminds me of a knitted i-cord.
Start out as if making a spiral hotpad. Then continue as you did in making the hotpad -- except do not make any increases. In the variation here, the stitches are crocheted through the back loop.
In particular, as before, "ch 6, join" means to join the last ch to the first with a slip stitch. Then "Work 1 sc in each st" is exactly how we started the hotpad -- round 1.
"Without joining rows" means do not slip stitch the last stitch of a round to the first stitch of the round -- in other words, work in a spiral just as you did the hotpad.
Finally, "working in back loop of stitch only" means to crochet into the back loop -- and not under the entire loop (both front and back loops) as we did when making the hotpad. This, crocheting into the back loop, leaves a ridge which spirals around the cord.
The cord in the last picture is made in Peaches & Creme and a size 7 or H (4.50 mm) crochet hook. It's about an inch across.
Tuesday, May 27, 2008
Tuesday, May 20, 2008
Why the ch 2?
For both diamond dishcloths, we started out rows with ch 2 followed by a dc into the last dc of the previous round -- instead of making a ch 3 as a replacement for the first dc of the row.
The main reason for this is to give a nicer edge for times when you don't want to crochet on an edging later. The reason that this gives a nicer edge is that crochet stitches don't rest exactly on top of each other.
In knitting (in plain stockinette), each knit stitch rests squarely on top of the stitch from the previous row. (A notable exception is when one knits through the back loop across every other row. But, we're not going to go into that here.)
In crocheting, this is not the case. The stitch rest just a little bit to the right of the stitch from the previous round. This can be most clearly seen in the picture in the second row from the top (a right side row). The dishcloth ended up square because when working on the opposite side of the dishcloth, the new stitches will also rest a bit to the right. And that "bit to the right" looks like a "bit to the left" when looked at from the first side. This can be seen most clearly in the first row from the top (a wrong side row from this perspective).
The ch 2 at the beginning of a row fills in the side a little. By the way, if we started the row with a ch 3 substitute for a dc, there would be a small gap between the ch 3 and the following dc.
Tuesday, May 13, 2008
Filet Crochet Diamond Dishcloth - v2
The dishcloth we made last week had a mesh size 3 dc's wide. It's also possible to have a mesh only 2 dc's wide – with an open mesh consisting of only 1 chain st. The result is squarer.
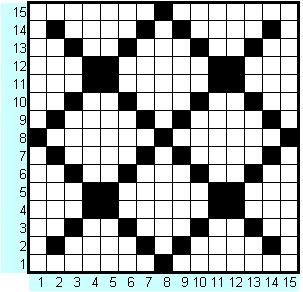
The diamond pattern to the right shows such a pattern. Since a dc is approximately twice as high as it is wide, a block of 2 dc's will be approximately as high as they are wide. So, the chart has column widths and row heights the same. The chart has as many rows as columns. The resulting dishcloth itself is 31 sts wide by 15 rows tall (excluding the foundation or base chain).
Filet Crochet Diamond Dishcloth - v2
I used some left-over Peaches & Creme (or else Sugar 'n Cream) cotton yarn – worsted weight – and a size 5 or F (3.75 mm) crochet hook. Finished size 8" x 7 ½"
(As was the last pattern, this pattern was made up by yours truly just for this blog.)
Foundation: ch 33
Row 1: dc in 3rd ch from hook, dc 14, ch 1, sk 1, dc 15, ch 2, turn
Row 2: dc 3, ch 1, sk 1, dc 9, ch 1, sk 1, dc 3, ch 1, sk 1, dc 9, ch 1, sk 1, dc 3, ch 2, turn
Row 3: dc 5, ch 1, sk 1, dc 5, ch 1, sk 1, dc 7, ch 1, sk 1, dc 5, ch 1, sk 1, dc 5, ch 2, turn
Row 4: dc 7, ch 1, sk 1, dc 1, ch 1, sk 1, dc 11, ch 1, sk 1, dc 1, ch 1, sk 1, dc 7, ch 2, turn
Row 5: same as Row 4
Row 6: same as Row 3
Row 7: same as Row 2
Row 8: ch 2, then starting with 3rd to last dc in previous row, dc 13, ch 1, sk 1, dc 13, ch 1, sk 1, dc 1, ch 2, turn
(This row is different from the others. The ch 2 from the previous row isn't used as an edging. Instead it's used as the beginning of a ch 3 substitute for a dc. The following st, a ch st, is the top of an open filet. This is the only row of the pattern worked this way. Row 8 is the row being worked in the picture.)
Row 9: same as Row 2
Row 10: same as Row 3
Rows 11 – 12: same as Row 4
Row 13: same as Row 3
Row 14: same as Row 2
Row 15: dc 15, ch 1, sk 1, dc 15
Fasten off and weave in ends.
Note: Lion Brand has a wonderful collection of stitch patterns made into dishcloths. It also sends out a weekly newsletter with a stitch of the week made into a dishcloth. This is a great way to learn and try out new stitches.
Tuesday, May 6, 2008
Filet Crochet Dishcloth
In designing a filet crochet pattern, the first thing to remember is that each "square" is actually 3 sts wide – a dc plus either 2 dc's or 2 ch's. The height of each "square" is a dc's height or, in other words, the height of 2 ch's.
I used a spreadsheet for this. In order to make a filet crochet pattern that will look a bit like the finished object, one needs to adjust the cell height and width. To do this, select the entire sheet by either clicking in the corner above the "1" and just before the "A" or click "Edit" – "Select all". Then select "Format" – "Row" – "Row height" and change it to "0.2". Finally, select "Format" – "Column" – "Column height" and change it to "0.3" -- or any combination that will give a ratio of 3 to 2.
After fiddling around a little, here's the design I came up with. (I copied the cells to "Paint" and then saved the result as a .jpg before posting it here.) The black cells are the holes or "open mesh" and the clear ones are the solid part or "closed mesh".
There are 9 cells across. -- which means 9 * 3 + 1 sts across – or 28 sts across on each row. To be different, I decided not to work an edging. So, I'm starting each row with a ch 2 – which is not a substitute for a stitch. It is there only to make a nicer edge. -- This is an alternative to starting a dc row with ch3 as a substitute for the first dc. -- For this alternative, the first dc of the new row is placed in the top of the last dc of the previous row.
Hint: When making long foundations chains, make the chain longer than needed. Then undo the unneeded sts after finishing the next row. It's better to have too many ch sts at the beginning of a long project than too few.
Filet Crochet Diamond Dishcloth
I used some left-over Peaches & Creme (or else Sugar 'n Cream) cotton yarn – worsted weight – and a size 5 or F (3.75 mm) crochet hook.
finished size 7" x 6"
ch 30. Start work in 2nd chain from hook.
Row 1: dc 28, turn
Row 2: ch 2, dc 7, sk 2, ch 2, dc 10, sk 2, ch 2, dc 7, turn
Row 3: ch 2, dc 4, * sk 2, ch 2, dc 4 * across, turn
Row 4: ch 2, dc 13, sk 2, ch 2, dc 13, turn
OR (Row 4: ch 2, dc 1, sk 2, ch 2, dc 10, sk 2, ch 2, dc 10, sk 2, ch 2, dc 1, turn)
Row 5: same as Row 3
Row 6: same as Row 2
Row 7: same as Row 3
Row 8: same as Row 4
Row 9: same as Row 3
Row 10: same as Row 2
Row 11: same as Row 1
Fasten off and weave in ends.
Note: When dc-ing a stitch into a chain st, dc into the chain itself just as you did in Row 1.
Note: It will look as if you're making the last dc of a row between a dc and the ch 2. This is how it should look.
A thought: Filet crochet with dc's and ch-2 holes produces holes that are basically square but a design that is squatted down. The beginning and end rows of dc's were added to counteract this squatness. However, this design could be reworked with triple crochet sts intead of double crochet sts to produce a square dishcloth but holes that are elongated:
ch 31. Start work in 3rd chain from hook.
Row 1: ch 3, tr 7, sk 2, ch 2, tr 10, sk 2, ch 2, tr 7, turn
Row 2: ch 3, tr 4, * sk 2, ch 2, tr 4 * across, turn
Row 3: ch 3, tr 13, sk 2, ch 2, tr 13, turn
OR (Row 3: ch 3, tr 1, sk 2, ch 2, tr 10, sk 2, ch 2, tr 10, sk 2, ch 2, tr 1, turn)
Row 4: same as Row 2
Row 5: same as Row 3
Row 6: same as Row 2
Row 7: same as Row 3
Row 8: same as Row 2
Row 9: same as Row 1
Fasten off and weave in ends.
Subscribe to:
Posts (Atom)