Tuesday, March 25, 2008

Irish Crochet Rose - 2

For round 2 of the rose, we'll add the first round of petals. There are 6 petals, one for each loop of the previous round. Each petal begins and ends with a sc. There are dc's in the middle of the petals.

A dc is twice the height of a sc. And so, for a smoother curve to the petal, it would be nice to have a stitch that is about halfway in height between the two. That stitch is the half double crochet. At the right is a description of the stitch from the American Thread Company booklet. It's called a short double crochet there. (The British call the stitch a half triple crochet.)

To work the stitch, start out as if making a double crochet. But, instead of pulling the thread through 2 loops twice (as for a dc), pull the thread through all 3 loops. NexStitch has a video.

The second round is (paraphrasing the directions from the booklet):
2nd Row: In each loop work 1 sc, 1 hdc, 3 dc, 1 hdc, 1 sc.

Here are 4 petals plus part of a 5th. Since the pattern calls for 7 sts in each ch 3 loop, there is apt to be crowding. Scoot the sts over a bit to make more room for the rest of the sts. That's what needs to be done in the picture to finish the 5th petal.

Tuesday, March 18, 2008

Irish Crochet Rose - 1

In honor of St. Patrick's Day and also in honor of the soon-to-be arrival of spring, our next project is an Irish crochet rose. The picture at the right is of this type of rose done as a border for a doily. The pattern is from an old issue of Workbasket Magazine. (My grandmother had a subscription to Workbasket and let me borrow various issues.) It's made with size 10 crochet thread. The roses were made separately. The inner halves of the roses were attached in the second-to-last round of the doily, the outer halves in the last round.

The pattern we will be working with comes from the American Thread Company Booklet but appears to be the same pattern as the Workbasket one. To be different and to see how the rose looks in a different size, I'm going to use worsted weight yarn (in particular Wool-Ease) and a size F (or 5) hook.

First a word about Irish crochet. ....

Last week, we talked about filet crochet. It is, at its most basic, a grid of dc and ch sts. It's lovely in its own right. Irish crochet is, at its most basic, a lot of ch sts to produce not a rectangular grid but triangles and diamonds. Some of these diamond shapes are visible in the upper left hand corner of the first picture. It's also lovely and possibly more of what one thinks of when thinking of crocheted doilies. However, Irish crochet is not limited to circular doilies. It can also be worked back and forth.

Here's the first part of the pattern (from the American Thread Company booklet):

"Ch 7, join to form a ring, ch 6, dc into ring, * ch 3, dc into ring, repeat from * 3 times, ch 3 and join in 3rd st of ch 6 at beginning of row." -- for a total of 6 loops. I'm not sure whether or not it's a typo. But, the part between the asterisks should be worked 4 times.

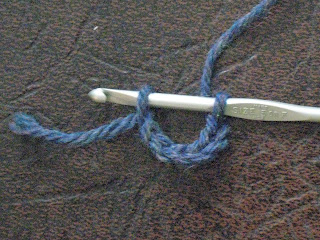
To begin, chain 7 and join to form a ring. The second picture shows the project at the point of joining to form a ring -- ie, making a slip st in the first st. So, after chaining 7, put the hook through the first ch st, yo, and draw the yarn through both loops.

Note: This is the usual way to start a circular project. The ch 7 produces a nicely defined circle. One could start out with as few as 3 ch sts for a smaller loop. More than 7 ch sts would probably produce too large of a loop. (More on this is at the end of the post.)

Then ch 6, dc into ring, * ch 3, dc into ring *. The third picture shows the second dc into the ring. The first 3 sts of the ch 6 are a substitute for a dc.

If you're going to use the tail later for attaching the rose to a garment or a purse, then let the tail dangle. If not, hide the tail as you dc into the ring. The picture has the tail next to the ch ring and partially hidden under the dc's.

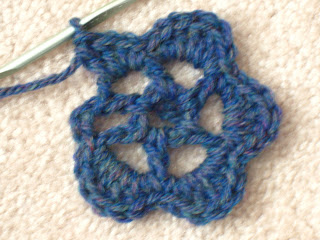
And here is the completed first round. There are 6 chain loops, not counting the center one. The last st is a slip stitch.

A final word: To have no loop at the center (which is another usual way to start a circular project), do not make a loop to start out. Instead of making dc or sc (or whatever) sts into a loop, make them into the 1st st. The first round of the pattern would then be written:

Ch 7, dc into 1st st, * ch 3, dc into 1st st * 4 times, ch 3 and join to 4th st of ch 7 at beginning of rnd.

Tuesday, March 11, 2008

Filet Crochet

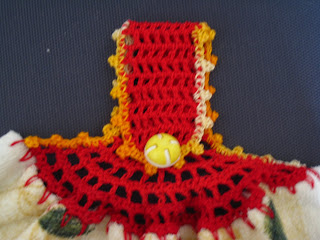
The terry cloth dish cloth hanger is now finished. It used a couple different mesh patterns plus a buttonhole plus a picot edging. Here is a pic.

Meshes are part of a type of crocheting called filet crochet.

Two basic meshes in filet crocheting are the open or filet mesh and the block or solid mesh. The American Thread Company booklet shows how to do both of these basic meshes.

The picture at the top is of an open or filet mesh. To start off this mesh from a chain base, first chain 8 plus a multiple of 3 sts. Then, quoting from the booklet, "work the first dc in 8th ch from hook, * ch 2, skip 2, dc in next st, repeat from *. Succeeding rows, ch 5 to turn and dc in dc, * ch 2, dc in next dc, repeat from *."

The 7 unworked chain sts at the beginning of the first row represent 2 ch sts for the top and 2 for the bottom of the first mesh hole and 3 ch sts to replace a dc at the beginning of the row. The ch 5 at the beginning of subsequent rows is 3 ch sts in place of a dc plus 2 ch sts for the top of the mesh hole.

The picture at the bottom has block or solid meshes filling in some of the open mesh squares. To work the mesh pictured from a chain, first chain a multiple of 6 sts. Then, work a dc in 4th ch from hook, dc 3, * ch 2, skip 2, dc 4, repeat from *. (The ch 3 at the beginning of the row counts as a dc.)

Note that for the 4 dc blocks, the first and last dc's are made in the top of a dc and the middle 2 dc's are made in a chain space.

For subsequent rows, alternate:

Ch 3, skip 1st dc, dc 2, * dc 4, ch 2, skip 2, repeat from *, end with dc 7
(or, alternatively, for an open mesh at the beginning and end of the row, ch 5, skip 1st 3 dc's, * dc 4, ch 2, skip 2, repeat from *, end with dc 1.

Ch 3, skip 1st dc, dc 3, * ch 2, skip 2, dc 4, repeat from *.

It's easy to design your own filet crochet patterns and mesh patterns. Get some graph paper and shade in the squares that you want as chain spaces. Here's a link to a traditional filet design, a spider.

Here's a diamond mesh design that I made up years and years ago for a throw (in worsted weight yarn). The rows are:

Row 1: Ch 3, * dc 2, ch 1, skip 1, dc 2, repeat from *.
Row 2: Ch 3, * dc 1, ch 1, skip 1, dc 1, ch 1, skip 1, dc 2, repeat from *.
Row 3: Ch 3, * ch 1, skip 1, dc 3, ch 1, skip 1, dc 1, repeat from *.
Row 4: Ch 3, *dc 2, ch 1, skip 1, dc 2, ch 1, skip 1, repeat from *, but last time dc 1 instead of ch1, skip 1.
Row 5: Same as Row 3.
Row 6: Same as Row 2.

A final note: For each of these rows, I've started out with a ch 3 as a replacement for a dc. There is another equally good (and sometimes better) way to start rows of dc's. --- Ch 2, then dc in the first not the second stitch, as we had been doing. The ch 2 is not a replacement for a dc. It just gives a more interesting edge. This ripple afghan pattern has an edge like this. It's done in sc, and so there is a ch 1 at the beginning of each row.

Tuesday, March 4, 2008

Picot Edging

First of all, I want to say that I've made this hanging kitchen towel thingy many times and have never given it a picot edging. I've never started and ended the edging with a slip stitch before either. But, there's always a first time for everything.
-- I have always made it with an edging, though.

When adding an edging in knitting, one has to be careful about row and stitch gauge. A knit stitch is about 1 1/2 times wider than it is tall (at least for a gauge of 4 sts and 6 rows per inch). So, the number of stitches to be picked up along a vertical edge is different than the number of rows along that edge.

On the other hand, a single crochet stitch is pretty much as tall as it is wide. When picking up stitches along a vertical edge, one would pick up 1 st off of a row of sc's and 2 sts off of a row of dc's and 3 sts off of a row of tr's, etc. (A dc is about twice as tall as a sc, and a tr is about 3 times as tall.) The picture shows a picked up edge (plus some picots).

------

After finishing off the buttonhole and weaving in the ends, I started with another color of thread. As usual, for starting any crochet project, I made a slip stitch knot around the hook. Then since I wanted an almost invisible start to the edging, I did a slip stitch stitch into the bottom of the first sc in the project (as in the picture at the right). -- To get the yo through the starting loop more easily, I held one edge of the loop (the part of the loop with the loose end) with my left hand. That completed the slip stitch. Then, I did a sc into the edge of the next row, a sc row.

Then comes the first picot.

I used the first method of making picots (as described in the American Thread Company brochure excerpt). I chained 3 and then did a slip stitch into the top of the last sc. NexStitch has a nice video of the stitch.

As you can see, it is a bit difficult to do. That's probably why there is an alternative way to do the picot (as mentioned by both the booklet and NexStitch) -- namely, instead of doing a slip stitch, make another sc (or whatever stitch the picot is on top of) "in the same space" or, in other words, as if one were doing an increase.

Just doing a sc without either the slip stitch or the "increase" would make the picot too open.

One isn't limited to doing just 3 or 4 chains for a picot. It just depends on how large you want it to be. However, with more chain stitches, the inside of the loop of chain stitches becomes more visible, and it's naturally called a chain loop. One is also not limited to doing picots on top of sc's. It can be done on top of most any stitch. Picots also don't have to be restricted to edgings.

To finish this edging, repeat *sc 4, picot* around. For the buttonhole, pick up as many stitches as were skipped at the bottom of the buttonhole. End by making a slip stitch.